
Creating and Editing Models
SketchUp for Web gives you the same modeling tools you know and love from the desktop version with just a few differences to make it web-friendly.
Note: While SketchUp for Web is available without a subscription, you need a Trimble ID to use it. See Trimble ID for more information about creating or logging in with your Trimble ID. Some features are only available to users with a SketchUp subscription. For a list of features and their availability, see SketchUp for Web's Features.
Creating a New Model
When you launch SketchUp for Web, the Home page appears. To create a new model, click Create new or select a unit of measurement for your model.

Changing the Unit of Measure
You can change the unit of measure used in your model at any time in App Settings.
 ), select App Settings and find the Default template dropdown in the Regional section of the General tab.
Importing Files and Images
SketchUp for Web allows you to seamlessly import both 2D imagery and 3D geometry directly into your model. Subscribers can import files saved in the following supported formats:
2D formats: .
jpg, .png3D formats: .
3ds, .dae, .dem, .dwg, .dxf, .kmz, .stl, .skp
Note: If you don’t have a SketchUp subscription, the supported formats are: .jpg, .png, .skp.
You can import image files into your model as images or materials. If you import a CAD file, it becomes a component.
To import a file:
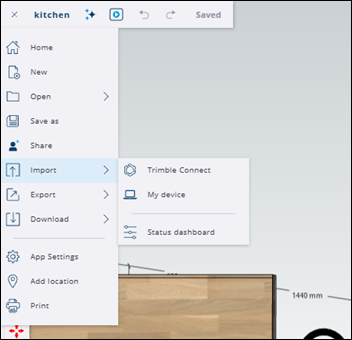
- Select Import (
 ) from the Main Menu.
 - Select My Device or Trimble Connect, depending on the file location.
To import from your device: Drag and drop the file onto the Import File modal, or select the device icon and browse for the file.

To import from Trimble Connect: Locate and select the file you would like to import from your saved projects.
If you are importing an image file, the As Image and As Material options appear on the Import File modal:
Clicking As Image imports the file as an image into your model.
Clicking As Material imports the file as a material into your model. After you apply the image to a surface, SketchUp adds it as a material to the surface and as an option in the Material panel.

For more information on how to use imported files in your models, see Using SketchUp Data with Other Modeling Programs or Tools.
SketchUp for Web's Panels
The SketchUp for Web panels appear on the right side of the interface. Each panel provides a specific set of features.
Panel | Icon | Article | Description |
|---|---|---|---|
Comments |  | When you collaborate on a model, the Comments panel lets you add your own comments or locate and review comments left by others. | |
Entity Info |  | Entity Info shows information about a selected entity, including materials used, the number of components, and any assigned tags. | |
Outliner |  | The Outliner panel presents a model's objects as a hierarchical tree. | |
Instructor |  | N/A | The Instructor panel provides helpful hints based on which tool is activated. |
3D Warehouse |  | 3D Warehouse is a website of searchable, pre-made 3D models that works seamlessly with SketchUp. | |
Components |  | Components are the building blocks of your model. The Components panel lists each component and offers a few options to help you manage and manipulate them. | |
Materials |  | Materials help add detail and realism to your models. The Materials panel helps add and manage materials for use in your model. | |
Styles |  | Styles are grouped settings you can apply to your entire model at once. In the Styles panel, add Styles or manage a Style you've already added to your model. | |
Environments |  | Environments add a 360° panoramic background with image-based lighting conditions to your SketchUp models. | |
Tags |  | Tags help you organize objects and control their visibility. Manage or create Tags using the Tags panel. | |
Shadows |  | Designate how shadows appear or simulate how the sun would cast shadows in a geolocated model. | |
Scenes |  | Scenes represent different set model views. Manage and create Scenes in the Scenes panel. | |
Soften/Smooth Edges |  | Change the visibility of edges to help make a model look more realistic using less geometry. | |
Display |  | N/A | Manage visibility, including hidden geometry, shadows, and fog. |
Model Info |  | N/A | Find and adjust basic elements of your model in the Model Info panel, including measurement units and fonts. |
Solid Inspector |  | The Solid Inspector helps you check your groups and components for errors in geometry and automatically fixes some issues. |